Showing posts with label Condiments. Show all posts

Thursday, August 16, 2012

Cheesy Dipping Sauce (Or Pasta Sauce)

A cheese sauce:
For reluctant broccoli eaters.
To mix in with your favorite pasta.
To serve as an incredibly rich base for a sumptous soup.
Or to dip your head in after a long, bad day.

It's your call.

Whatever your choice may be, I hope you love it.

 To begin, melt butter in a medium-sized sauce pan.  Then add in the flour and whisk away.

 Keep whisking while the flour cooks into the butter.

 Then pour in the milk. Stir and cook for about 10 minutes as it deliciously thickens.

 Remove from heat (do as I say, not as I do...) and add the cheeses and spices.


Stir until lovely.

Here's the printable recipe.

Cheesy Dipping Sauce
Makes about 2 cups

2 tablespoons unsalted butter
2.5 tablespoons all-purpose flour
1.5 cups milk
7 ounces cheddar cheese grated (about 1.75 cups)
1 ounce Monterey Jack cheese (about 1/4 cup)
1/4 teaspoon coarse salt
1/8 to 1/4 teaspoon ground cayenne pepper powder (optional)
Pinch of garlic powder

Using a medium saucepan, melt the butter over medium heat.  Whisk in the flour and continue to whisk and cook for 2 minutes.
Slowly pour in the milk while continuing to whisk the butter/flour mixture.  The sauce will begin to thicken.  Stir for about 10 minutes.  Remove pot from heat and add in the cheeses and remaining ingredients.  Stir very well, until all cheese is melted and ingredients are well-incorporated.
Use immediately as a dipping sauce for veggies, breads, chips, etc.  Or as a sauce for pasta.  

Refrigerate unused sauce for up to 3 days.

Reheat cheese sauce in a saucepan over low heat, stirring until heated through.
(Recipe slightly adapted from here.)

Saturday, May 26, 2012

Strawberry Avacado Salsa


Our yard usually doesn't begin to look crispy about the edges until mid-July.  It's May and it's already happening.  Stating the obvious is never good for one's effort to appear intelligent, but I think it's going to be a hot one. 

So I've started rounding up my "coolest" recipes.  This salsa is at the top of the list.  The thought of combining strawberries and avocados in the same bite may cause you to shiver with revulsion, but I can assure you, it's good.  Add in a hefty squirt of lime juice and some salt, and it's kind of like eating a strawberry margarita.  On a chip.

The salsa is also excellent with grilled chicken (and it looks pretty, too).  

Speaking of looking pretty, I would get a giant "F" on the presentation of this salsa were I in culinary school:  the strawberries and avocados should be finely diced and uniform in size.  Do you think my involvement in a light saber battle with my little Darth Vader as I was preparing this recipe would count as a reasonable excuse as to why I simply could not make it happen?  

Mommy multitasking.  It should be an Olympic event.


Here's the printable recipe...

Strawberry Avocado Salsa

1 quart ripe strawberries, finely chopped
1 large avocado, peeled, seeded, and finely chopped
2 green onions (green part only), sliced into thin rings
1 tablespoon chopped fresh cilantro
Juice and zest from one large lime (about 2 tablespoons of juice)*
2 teaspoons finely chopped, seeded jalapeno pepper (optional)
1/2 teaspoon kosher salt

Combine all ingredients in a bowl.  Serve immediately (before the avocado begins to brown).  

To prepare ahead of time, combine all ingredients except the avocado.  Slice the avocado and add to strawberry mixture immediately before serving.

*To get the most juice from your lime (and other citrus products), microwave it for 10-15 seconds first.

Recipe adapted from Cooking Light

Friday, March 2, 2012

Homemade Oven- Dried Cranberries


It all started as I was trying to find some roasted garlic that I had frozen a few months ago.

During my quest, I came across things I had frozen YEARS ago.

Freezer-burnt beyond recognition, of course.

That meant it was time to clean out the freezer.

I found six (!!!) 12-ounce bags of frozen cranberries.  (Food hoarding: it's a little problem I have.)

Since I had just paid $4 for a 5 ounce bag of dried cranberries, I decided I needed to find a way to dry them at home.

Without any special equipment.

A quick Google search yielded this simple recipe.

It was a success!

I am going to try it with blueberries and strawberries next.


Rinse fresh (or thawed) cranberries well, 
picking out and removing any damaged or soft ones.
 

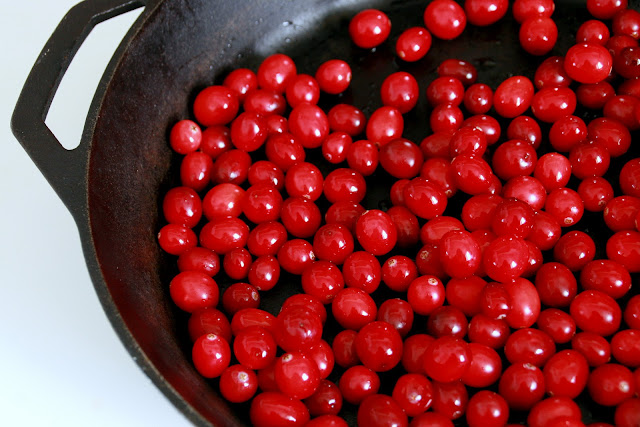
 Place cranberries in a large, heavy-bottomed skillet.

 Make a simple syrup (dissolve sugar in water).

Pour syrup over cranberries,
And cook over medium-high heat for 4-5 minutes until cranberries begin to pop.


 Mash them down with a spoon. 
(The more liquid you get out of them now, the better they will dry.)

Prepare a baking sheet by layering 3 paper towels,

and setting a sheet of parchment paper on top.

Spread mushed cranberries on the parchment paper.
(Don't worry...you'll be able to separate them when they've dried.)
And bake at 150 degrees for 6-8 hours.   (It's a long time, I know.)

The results:  they tasted great, I was able to control the amount of sugar, I freed up some freezer space, and I felt so dang resourceful. 


Variations:
Increase/decrease amount of sugar
Add some orange juice while you're cooking the cranberries
Use different berries

Making this recipe with a 12-ounce bag of cranberries yielded about one large handful of dried berries.  This is definitely something to make in bulk.  

Here's the printable recipe.


Homemade Oven-Dried Cranberries 
Yield - about 1 very large handful (Doubling or tripling recipe recommended)


1 (12-ounce) bag cranberries, rinsed, and brown/shriveled berries discarded
1/4 cup water*
1/2 cup sugar*

Preheat oven to 200 degrees Fahrenheit.

In a small sauce pan, prepare the simple syrup by dissolving the sugar in the boiling water.  Stir until no granules of sugar remains.  

In a large, heavy-bottomed skillet over medium-high heat, spread cranberries out in 1 layer.  Pour simple syrup over berries.  Stir well.  Berries will begin to soften and pop as they heat.  (It's kind of messy, so you might want to hold a pot lid as a bit of a sheild over the skillet.)  Use the back of a wooden spoon to gently pop the softened berries (this helps speed up the process).
When all berries have been popped, remove skillet from heat.

Line a large baking sheet with a layer of 3 paper towels.  Set a piece of parchment paper over the paper towels.

Spread cooked cranberries over parchment.  (Don't worry...you'll be able to separate them after they dry.)

Reduce the oven to 150 degrees F.  Place berries in oven.

Start checking on the berries after 6 hours (I baked mine for 8 hours.)  Baking times will vary depending on the humidity in your kitchen, your oven, etc.  

When they are dried to your satisfaction, use a flat, sturdy spatula to scrape the berries from the parchment.  Separate them and let them sit out until they are cool.  

Store in a zipper-lock plastic bag or in another well-covered location.  (I do not know how long the shelf-life is as we have already eaten almost all of this batch!)

*Using 1/2 cup of sugar yields a fairly tart dried berry.  If you like yours on the sweeter side, increase the sugar to 1 cup and use 1/2 cup of water to prepare the simple syrup.

Recipe from here.

Saturday, May 7, 2011

Strawberry Butter


This strawberry butter is a delicious, quick, and easy spread just begging to adorn your morning toast or tea bread. 

It's oh-so-simple to make...just use your blender or food processor to whirl together: 

1 stick of butter
1/3 cup strawberry jam
1/2 teaspoon fresh lemon juice
1/2 teaspoon powdered sugar


Cream ingredients together, transfer to a small dish, and chill. Bring the butter to room temperature before serving.


The butter can be refrigerated for several days
or frozen for several weeks. 

From: The Silver Palate Cookbook

Sunday, January 23, 2011

Strawberry Jam


Disclaimer #1:  I have never made jam before.

Disclaimer #2:  I googled "how to make strawberry jam" and this recipe was the first to pop up.

Disclaimer #3:  I am in the middle of a wild-eyed, wooden spoon-worthy fit.  I should just go put myself in the corner.

UGH.

The jam recipe I found here.  It calls for 2 pounds of strawberries.  I only had a frozen 10-ounce bag which I defrosted overnight.  I adjusted the amounts of the other ingredients to compensate for not having enough berries.

Truthfully, it's a little runny.  But that could be because it's only been in the fridge for about 2 hours.  Or, more than likely, I just goofed. 

And the fit?  Well, I am trying to teach myself how to take appealing pictures of food.  AND IT IS SO HARD.  Most of the time I only have one chance at a shot, and I have to move quickly because little people are closing in on me and my props.  Today I am learning about apeture, shutter speeds, ISOs, and depth-of-focus.  And now I cannot take a single stinkin' decent picture.  My brain feels like it's been in the blender.

So, please excuse the bad photos.  You are probably giving me more grace than I'm giving myself.  But thank you for having faith in me:  I promise I will learn how to take some good pictures that have equal exposure and appetizing appeal.

In the meantime...


After this point, you need to add sugar and lemon juice.

Put it in a saucepan and boil.
(Keep the lid on.  It will splatter and make a sticky mess.)

If you are going to store it, you have to do some additional steps. 
(See recipe below.)

If you are just going to refrigerate it and eat it within a few days,
just put it in a jar.


Here's my adjusted-amount recipe.

It makes a little over a cup of jam.

Strawberry Jam
1 10-ounce frozen bag of strawberries, defrosted (or of course, use ripe, fresh berries if you have them)
1.25 cups sugar
1/8 cup lemon juice

Mash the berries and place in a heavy-bottomed saucepan.  Add sugar and lemon juice.  Stir over low heat until sugar is dissolved.  Increase heat to high, and bring the mixture to a full rolling boil. Boil, stirring often, until the mixture reaches 220 degrees F. Transfer to hot sterile jars, leaving 1/4 to 1/2 inch headspace, and seal. Process in a water bath. If the jam is going to be eaten right away, don't bother with processing, and just refrigerate.

From allrecipes.com
 
P.S. If you have a good jam recipe, I'd be most obliged if you would share it with me.  Leave it in the comments or email me at cookingwithchopin@yahoo.com.